
Fantasy Photoshop
Sometimes you may find yourself performing a repetitive task in Photoshop and the software provides you with the ability to record a series of steps and save them to an Action. Whenever you need to run that series of steps again, you simply click on the action and Photoshop repeats the saved process automatically.
Some people, who happen to think on a much grander scale, have used this action recording system to create a world of artistic creativity that you can add to your images at the click of a button. For a very modest sum, you can purchase one of these pre-recorded actions and use them to enhance your photos and create your own works of art. At first glance, this may appear to be cheating but there is plenty of scope in relation to image selection and preparation along with a variety of artistic options that allow you to play a significant part in the creativity
Sample Images


Installing a New Action
Commercial actions are usually downloaded as a zip file. Once unpacked the file will contain the action file and a Read Me file giving instructions on installation and how to size and select the correct mode of your image, and hot to use the action.
If you open the Actions panel in Photoshop there is a small menu icon in the top right corner. Click on this to open a dropdown menu. From the menu select the newly downloaded action file and it will load into the actions list. Installation Video
In some instances, the action will require dedicated brushes which will also be found in the zip file. Brushes are loaded into Photoshop in a similar way to actions.
More detailed instruction should be available in the Read Me file.
Image Selection
It may appear obvious, but the most important step is image selection. Some images will be far more appropriate for an artistic fantasy treatment than others. I tend to use action shots, where there is obvious movement, and then chose a filter that would enhance that sense of motion. Most of the Actions that apply a motion effect also allow you to choose the direction in which the treatment will be applied, up, down, left or right.
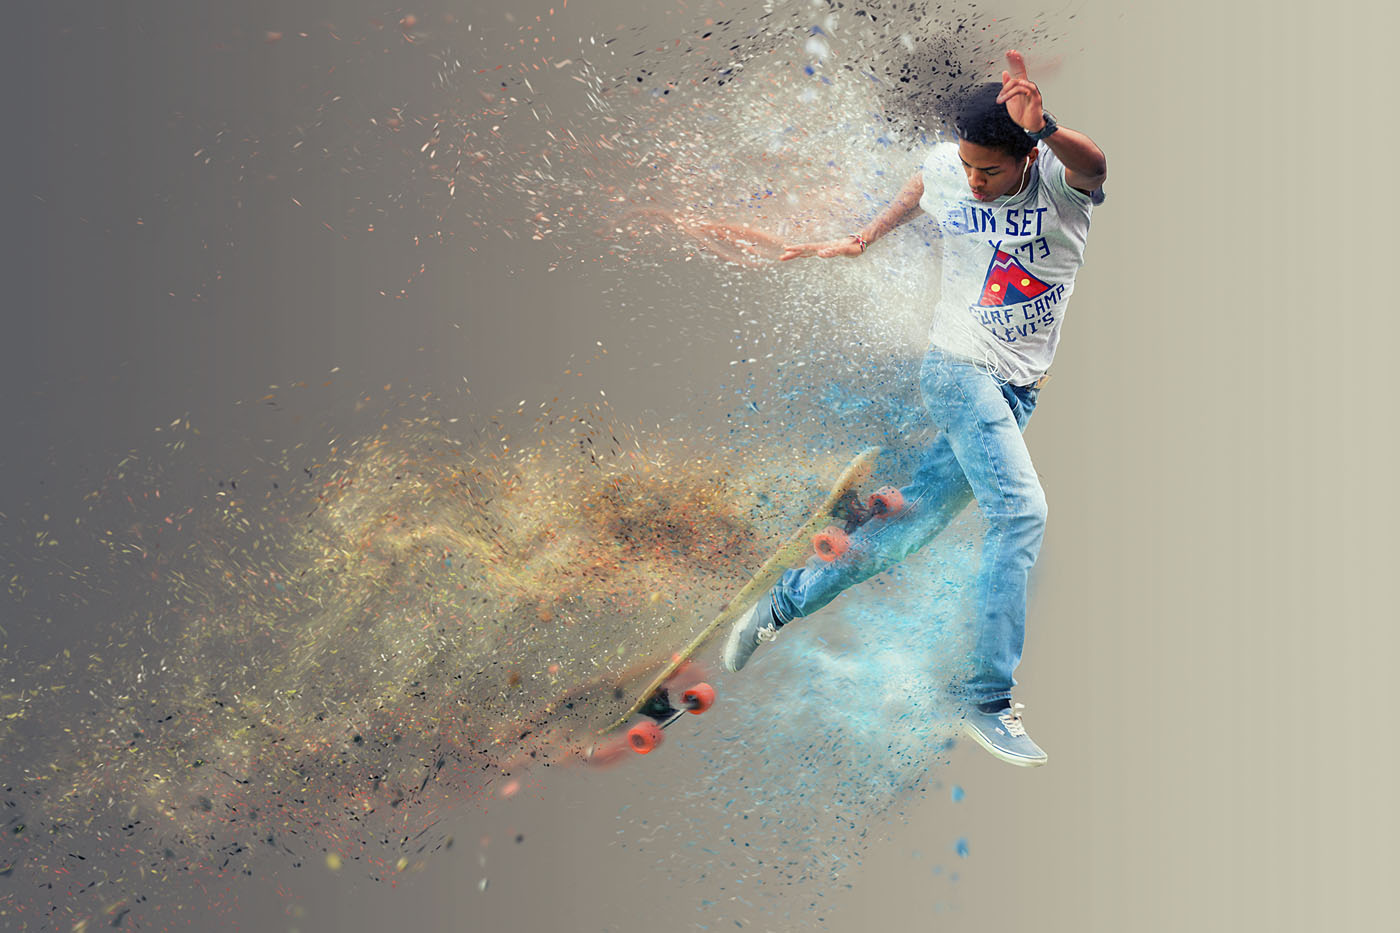
The easiest way to explain how the action is used is by example so I will run through the steps of my typical workflow using the Sandstorm Action.
Sandstorm Action Walk-Through

Step 1 - Image Selection
I took this fairly dull shot of a young man falling off his longboard while attempting the do a trick. I didn't like the original image because there was too much clutter going on in the background, it was compositionally weak and not particularly well lit.
However, there was a definite sense of motion from the shape of his body that looked interesting and worth processing.

Step 2 - Cut Out the Subject
I like to cut the subject out of the image and place them on a clean background before processing. The latest version of Photoshop includes a fairly refined auto-selection tool which is accessed from the Select >Subject menu. This selection can then be refined using the variety of selection refining tools Photoshop offers.
I also like to increase the canvas size in order to make sure that the Action output has space to breathe. It can always be cropped down later.

Step 3 - Create a suitable background
At this stage, I review the colours in the cut-out image and decide what would make a suitable background. In this particular case, I went for a graduated fade from light to dark grey. The Duststorm action creates a "disintegrated" particle effect from the image using the colours found in the image so a complimentary background will make or break the effect.
Once I am happy with the image preparation I flatten the layers. By doing this, Photoshop converts the file to a single layer which is locked and has the name "Background". For this particular Action, this is a mandatory requirement. At this point, I also check the Image Mode. The Sandstorm Action requires the image to be 8-bit colour and set to RGB colour.

Step 4 - Create the interaction layer
This action requires one final piece of information before it can run correctly. The portion of the photo to be used for the particle effects must be specifically identified. This is done by creating a new layer, which must be named "brush", and painting over the image, in any colour, where the effect is to be applied. This can be a case of trial and error depending on how much of the effect is required. Each time the action is run, there is also a randomness to the output.
For this image, my plan is to make the particle effects spread from right to left so I have painted the left-hand side of the skater's body.
When you install the action to Photoshop it creates 5 variants, Up, Down, Left, Right and Middle. Once everything is ready I simply click the appropriate direction Action. In this case, Left, and wait for the magic to happen.

Step 5 - Finishing Touches
Once the action has run its course the Photoshop file will contain dozens of new layers. Several, coloured purple, are used to control colour, tint, contrast and other aspects of the image. You will see from the screengrab that there are ten specific colour options that can be selected for review. Directly beneath that is the main Sandstorm layer complete with a mask. The mask can be used to remove particles from areas where you don't want them to appear. In this case, I don't like them appearing on the guy's face so I will mask them out. I also find the rider's body to be too hidden by the particles and will use a low opacity brush on the mask to recover some of the underlying image. Once happy with the finished image flatten the layers before saving, otherwise, the file will be enormous.
Hand Drawn Action Walk-Through

Step 1 - Image Selection
This action is much simpler and does feel a little like cheating, but the result is so delightful that I won't complain. The Handdrawn action creates a new version of your photograph that looks exactly like a hand sketch. I like to use this action for character portraits. In this case an old Vietnamese man with a Mona Lisa smile.

Step 2 - Select are to be drawn
To use this action simply create a new blank layer named "brush" and paint on the new layer any area of the original photo that you want to be converted to a hand-drawn image, then run the action. If the original file is too large the final output may be overly smooth. If you prefer a more coarse finished item, reduce the pixel size of the original image and run the action again.

Links to Sample Actions for Sale
All professionally written actions are usually implemented via one of the two methods described above.
There are many hundreds of actions for sale but here are a few of my favourites. When you click on the link you will be taken to the purchase page, which has a selection of sample images together with a video tutorial on how it must be used.
Leave a reply
You must be logged in to post a comment.